.png&w=48&q=75) App Install
App InstallWhy the 3-minute window after payment is the most profitable moment in your entire store — and how to use it.
Who this is for: Shopify store owners who want to increase revenue from existing customers without increasing ad spend.
The Gap Between "Order Placed" and "Thank You Page" Is Worth More Than You Think
Most Shopify merchants obsess over their product pages, their cart, their checkout flow. They A/B test button colors. They write and rewrite their product descriptions. And then the customer clicks "Pay now" — and the store does absolutely nothing.
No offer. No recommendation. No reason to spend a single rupee more.
That 3-minute gap — between payment confirmation and the thank-you page — is the single highest-intent moment in your entire customer journey. The purchase decision is already made. Trust is at its peak. The customer is in a genuinely good mood about buying from you.
This is what post-purchase page upsells are built for. Not thank-you page widgets. Not follow-up emails. The post-purchase page itself — the native Shopify surface that appears immediately after a customer pays, before they ever see your order confirmation.
This guide is specifically about that page. How it works, why it converts, and how to set it up properly on Shopify.
What Exactly Is the Post-Purchase Page?
The post-purchase page is a Shopify-native surface that appears after payment is completed but before the thank-you/order confirmation page loads.
Here's the exact flow:
- Customer enters payment details
- Clicks "Pay now"
- Payment is processed
- [POST-PURCHASE PAGE] — This is where your upsell lives
- Thank-you / Order confirmation page
This is not the same as the thank-you page. It's not an email. It's a dedicated interstitial that Shopify makes available to approved apps via its Checkout Extensibility framework.
The customer can add the upsell product to their existing order with a single click — no re-entering card details, no new checkout. It literally gets added to the order they just placed.
This is what makes it uniquely powerful. It's frictionless in a way no other upsell placement can match.
Why the Post-Purchase Page Converts Better Than Any Other Upsell Placement
Merchants who've set this up consistently report 10–20% acceptance rates on relevant offers. Some niches hit 25%+. Compare that to:
- Post-purchase email upsells: 1–3% click-through
- Pop-up upsells on product pages: 2–5% conversion
- Cart upsells: 5–8% (but carry cart abandonment risk)
The post-purchase page beats all of them — not because of clever copy or design, but because of timing and psychology.
The Psychology at Work
- Commitment bias: The customer has already said yes to your brand. Saying yes again is psychologically easier than the first yes — it feels consistent, not like starting over.
- Zero buyer's remorse yet: In the seconds after payment, the customer hasn't had time to second-guess their purchase. They're still in the positive emotional state of "I just got something I wanted."
- One-click removes all friction: The biggest obstacle to any purchase is re-entering payment information. Post-purchase upsells eliminate that entirely. The decision becomes: "Do I want this? Yes/No." Nothing else.
- Bounded offer window: A countdown timer (even a modest 4-minute one) creates the sense that this specific deal will disappear. Because it's genuinely tied to the order window, it doesn't feel manufactured — it feels real.
What Makes a Good Post-Purchase Page Offer?
Before we get into setup, let's talk about offer selection — because this is where most merchants get it wrong.
The #1 Rule: Relevance Beats Everything
Relevance is the single biggest driver of post-purchase acceptance rates. Your offer needs to feel like a natural extension of what the customer just bought.
Examples that work:
- Customer bought a camera → offer a memory card or lens cleaning kit
- Customer bought a skincare serum → offer the matching moisturizer or SPF
- Customer bought a yoga mat → offer a yoga block or carry strap
- Customer bought a formal shirt → offer a matching pocket square or collar stays
Examples that fail:
- Customer bought a jacket → offer a completely different product category
- Customer bought your cheapest item → offer your most expensive one
- Customer bought one product → show them three unrelated "bestsellers"
Price Point: Stay Within the 25% Rule
Research and merchant data consistently point to the same threshold: the upsell price should be no more than 25–30% of the original order value for maximum acceptance.
A customer who spent ₹3,000 will comfortably consider a ₹700–900 add-on. They won't seriously consider a ₹5,000 one — the cognitive weight of the decision works against you. This doesn't mean your upsell needs to be cheap. It means it needs to feel proportionate.
The Discount Has to Feel Exclusive
The one thing that makes a post-purchase offer feel special (not generic) is a discount the customer couldn't have gotten otherwise. "Add this to your order for 20% off — this offer disappears when you leave this page" is compelling. The same product at full price on the post-purchase page? Forgettable.
The discount doesn't have to be large. Even 10–15% framed as an exclusive add-on reward converts well. What kills conversion is showing the same price that's on your regular product page. Customers notice.
How to Set Up Post-Purchase Page Upsells on Shopify
Shopify doesn't offer native post-purchase upsell creation out of the box — you need an app that's built on Shopify's Checkout Extensibility framework. Apps like AI Upsell by WeUpsell, AfterSell, ReConvert, and Selleasy all support this placement.
Here's the full setup process using AI Upsell by WeUpsell:
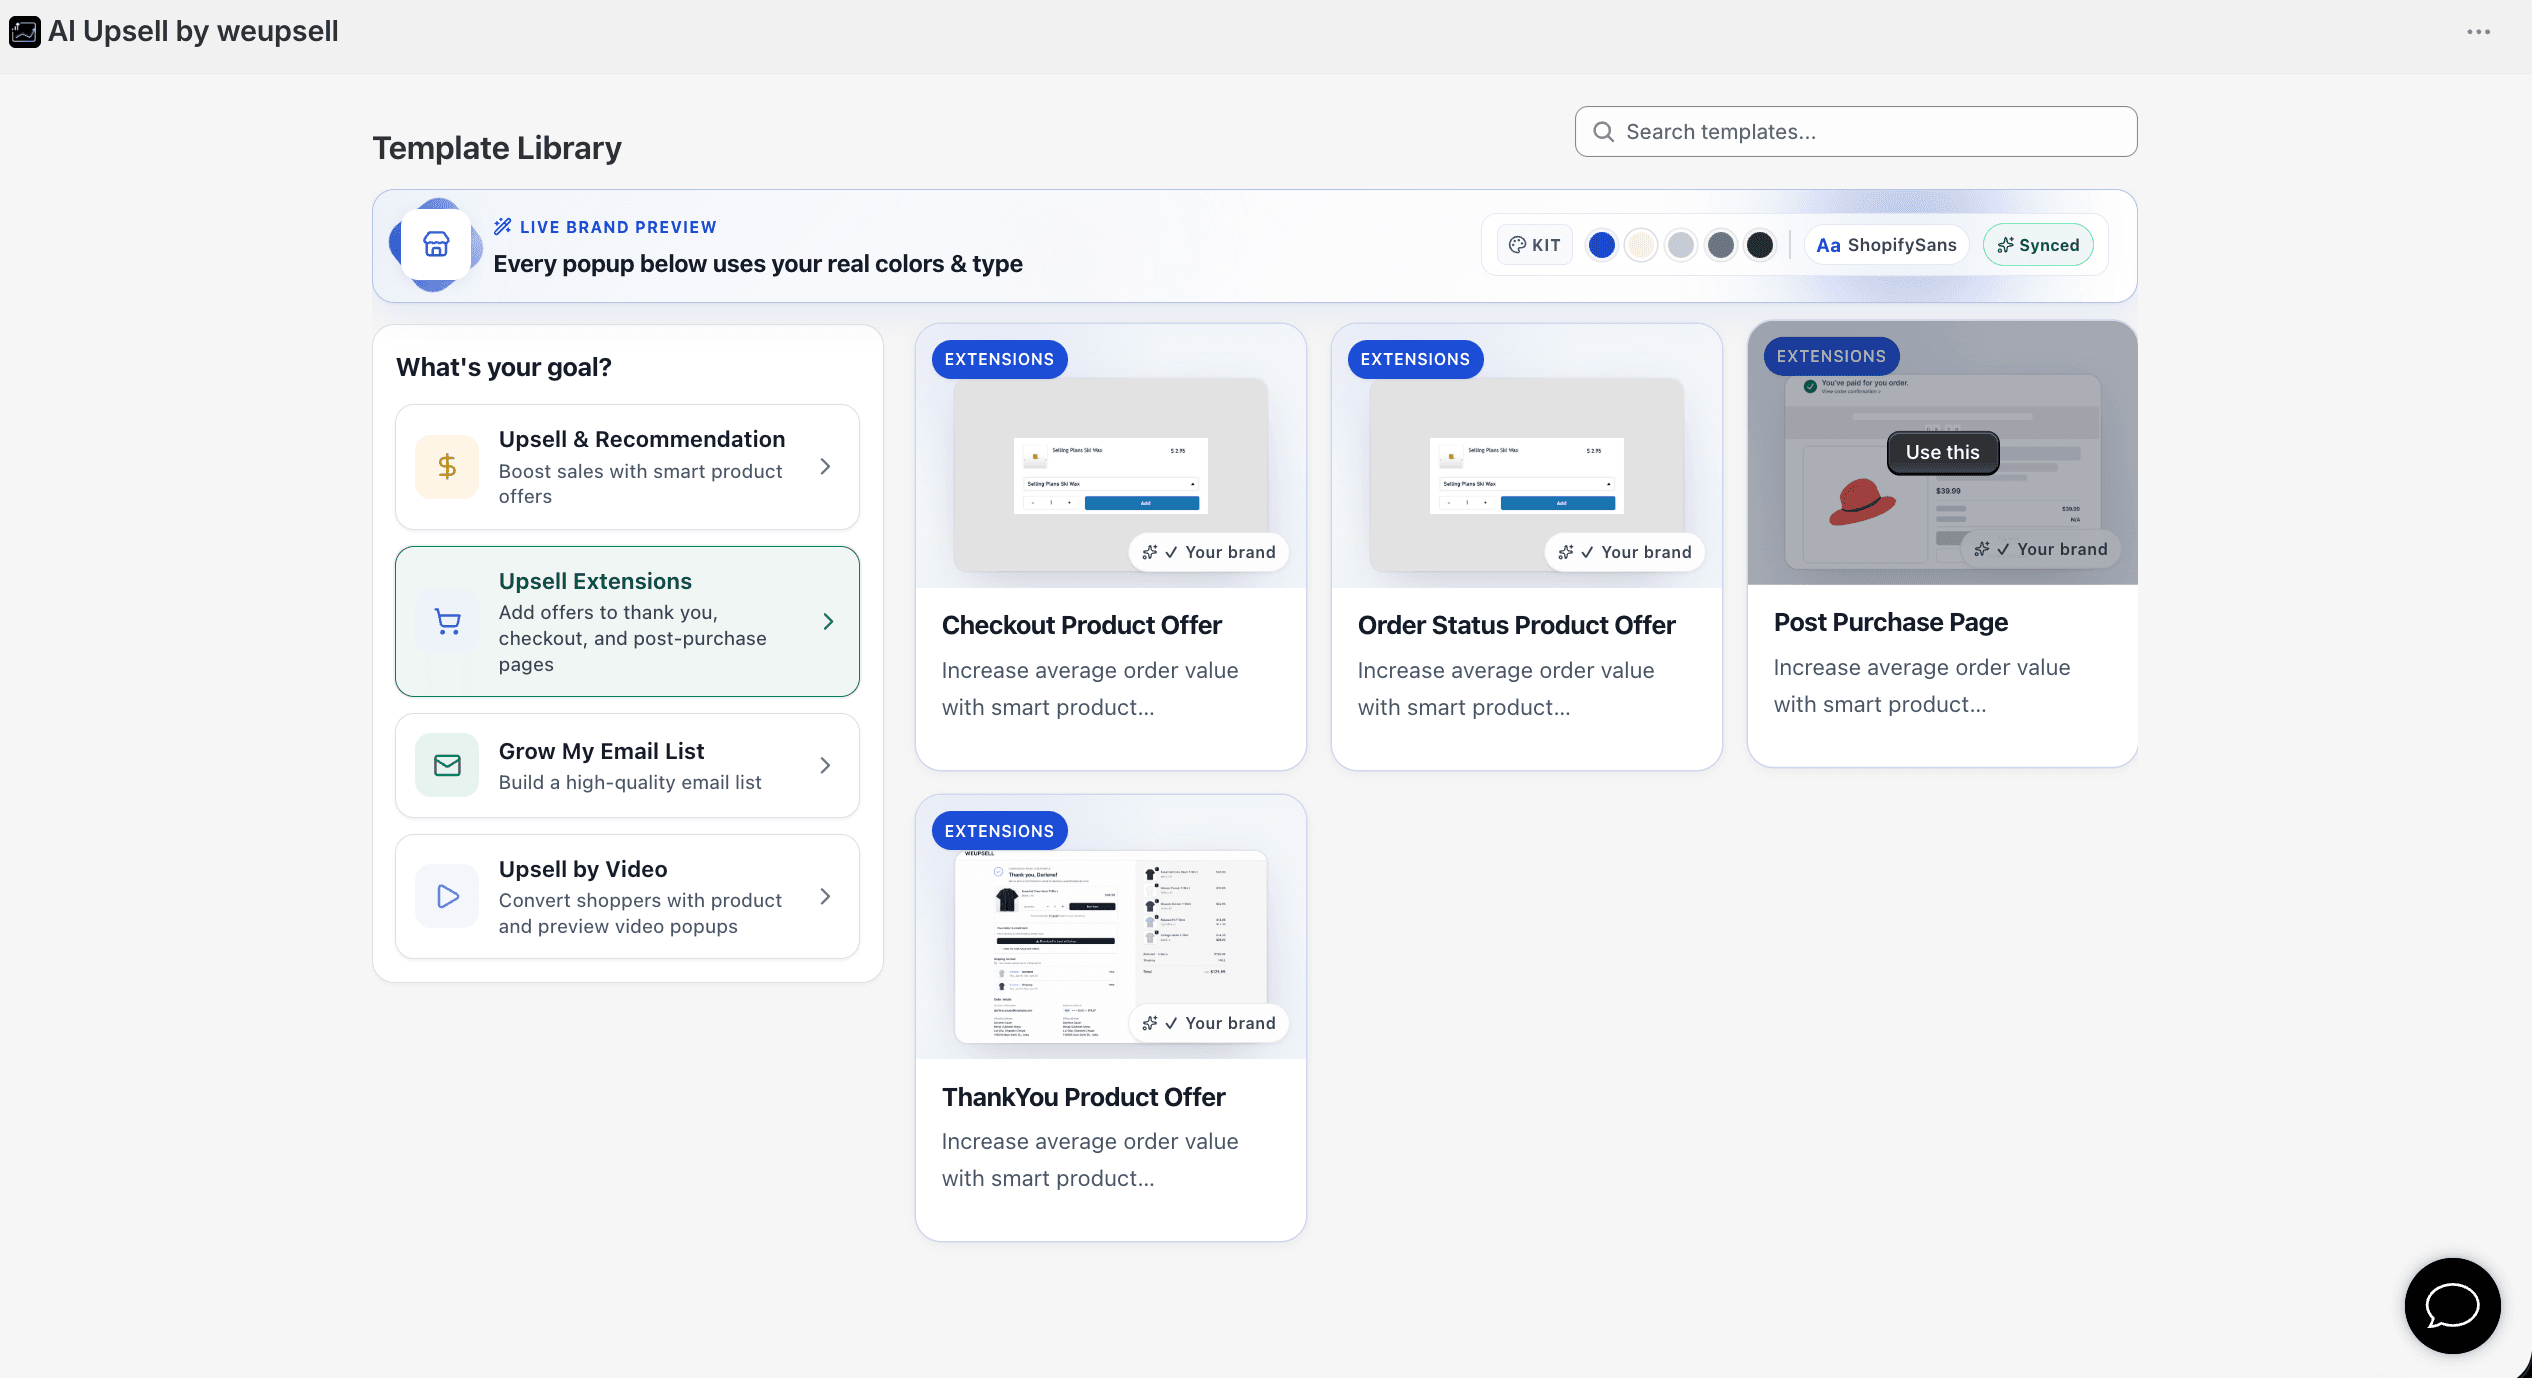
Step 1: Select the Post Purchase Page Template
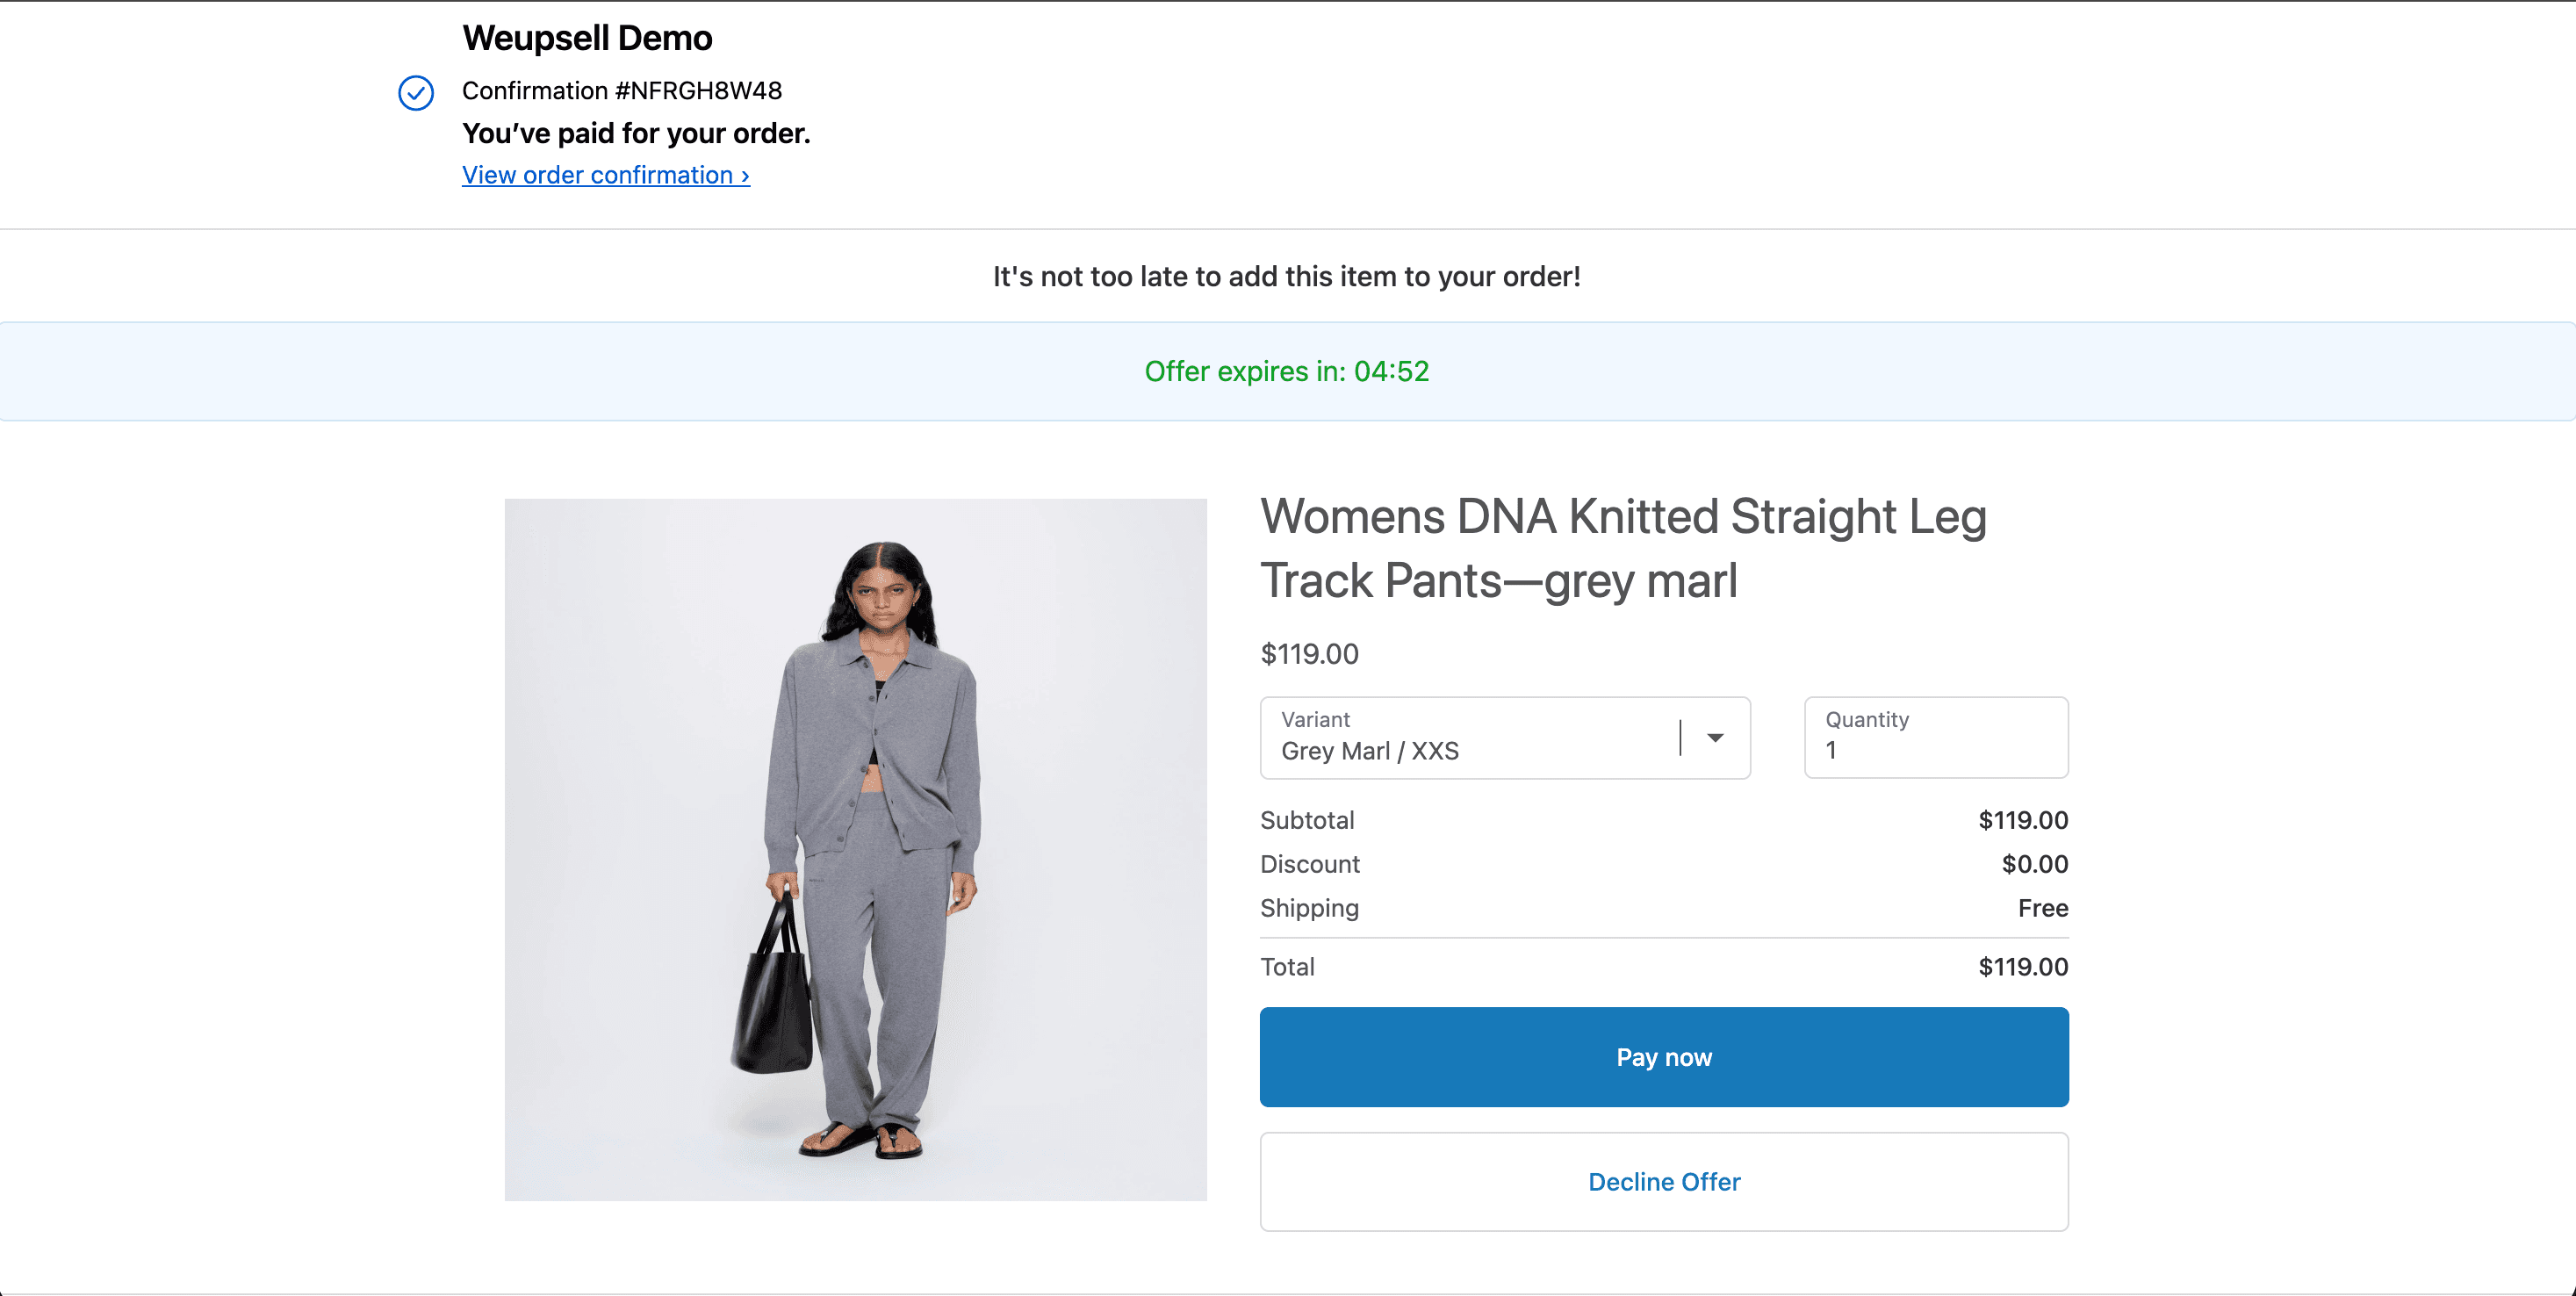
Inside the WeUpsell app, go to Templates in the left nav. Click Upsell Extensions from the left sidebar — this filters to checkout/post-purchase surfaces only. Select the Post Purchase Page template. You'll see a preview of how the offer renders on Shopify's post-purchase surface — including the "It's not too late to add this item to your order!" banner, the countdown timer, the product card, and the one-click "Pay now" CTA.
Step 2: Configure Your Product Offer
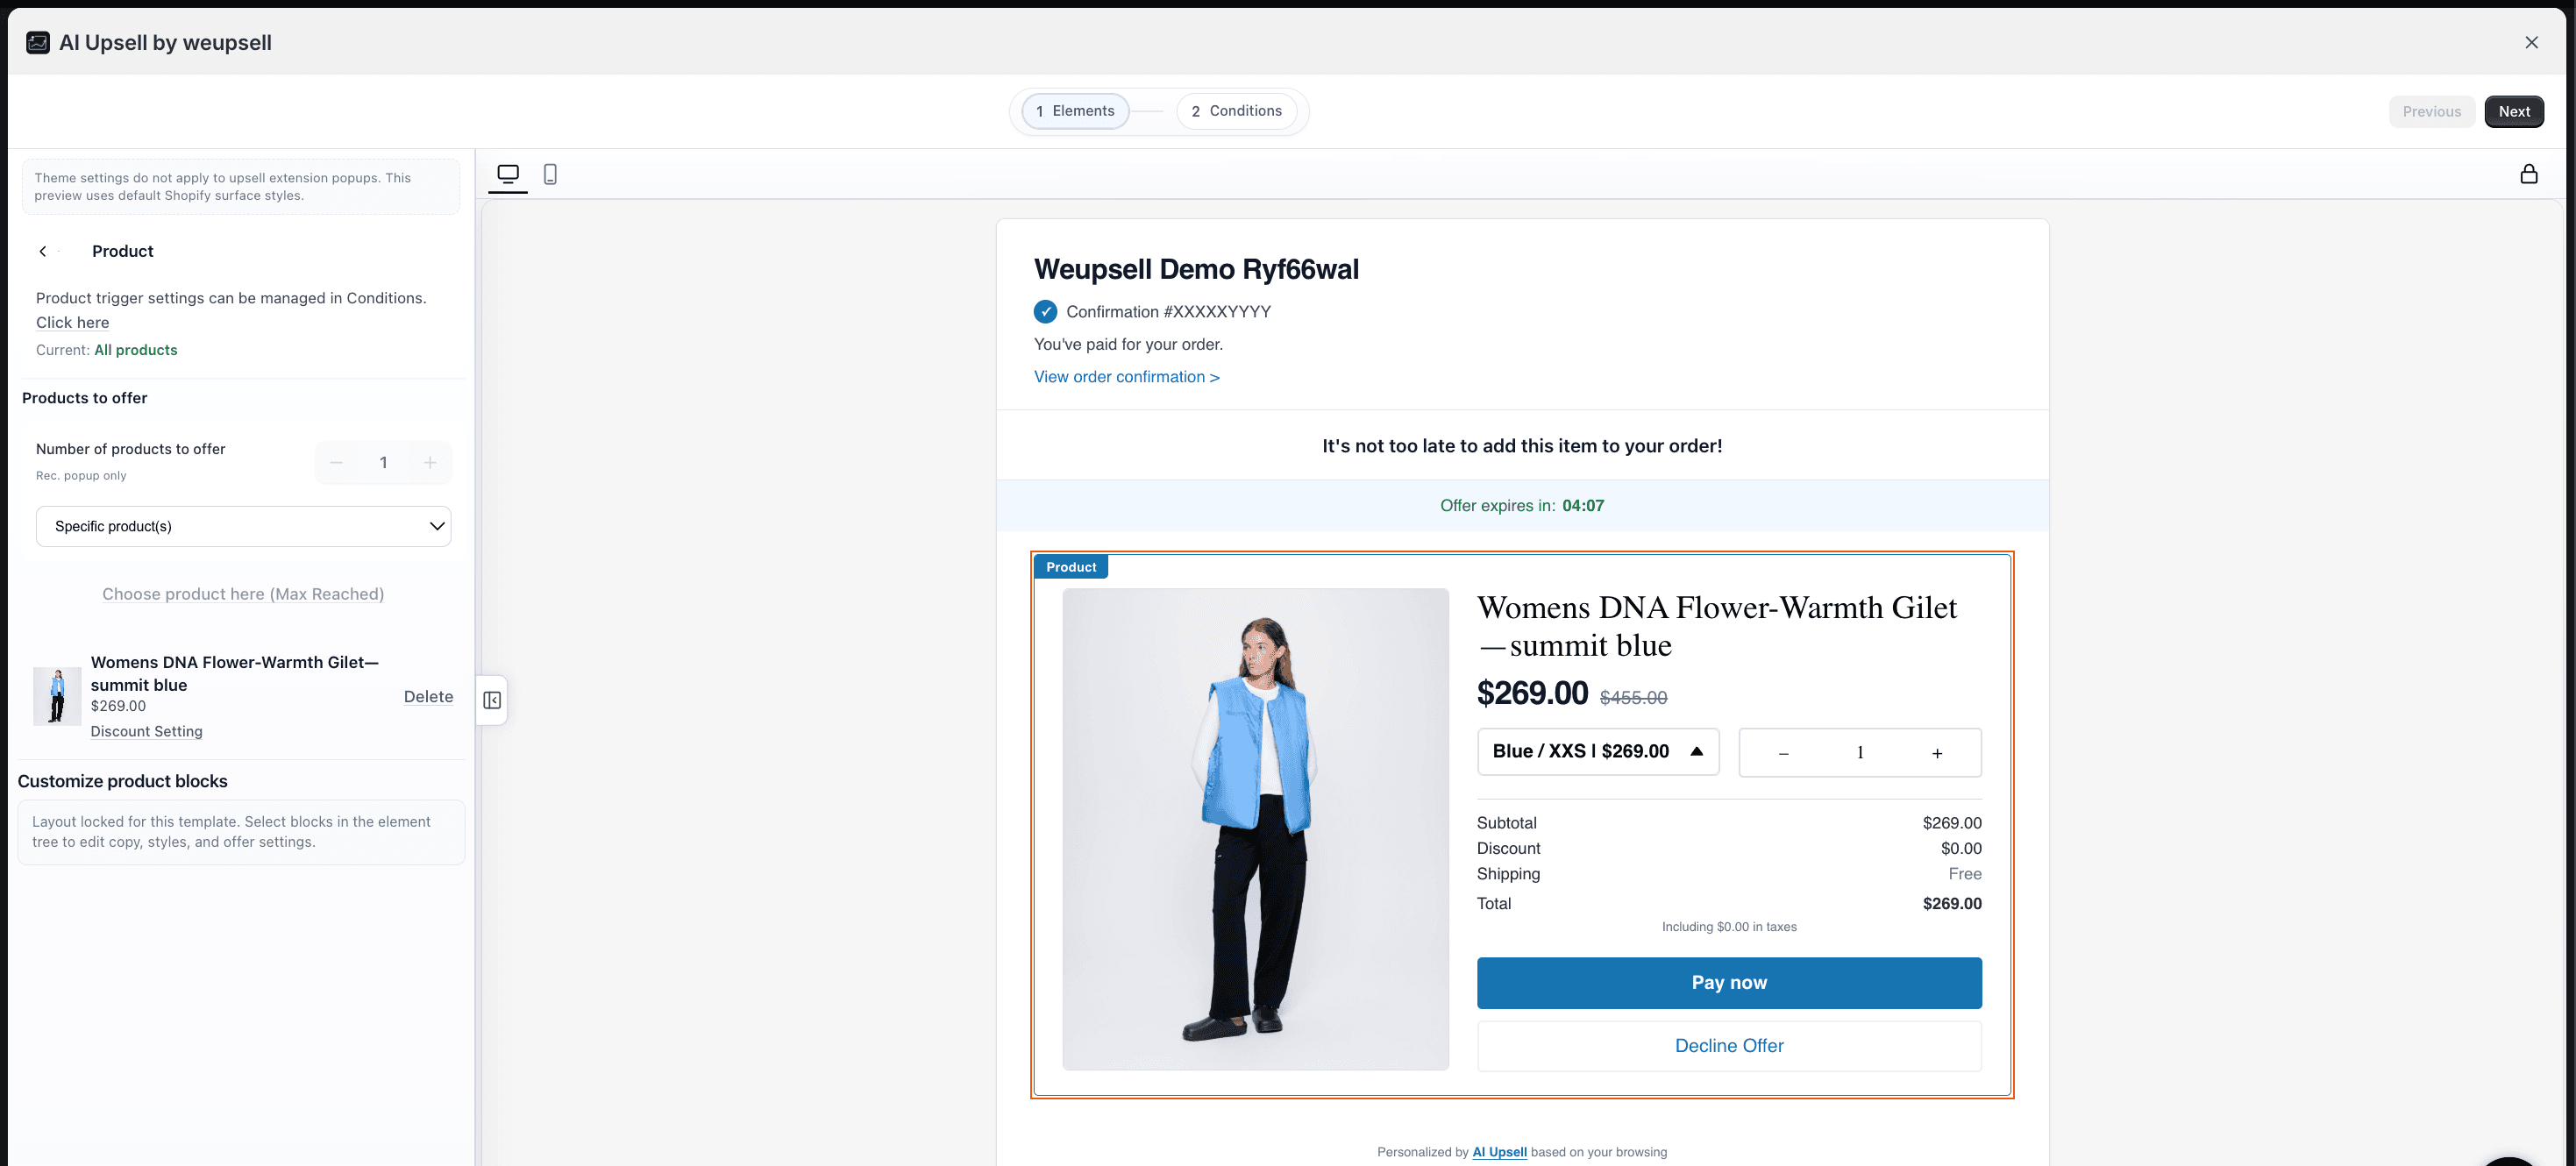
In the Elements panel (Step 1 of the template editor):
- Keep "Number of products to offer" at 1 — a single focused offer consistently outperforms a carousel of options
- Choose Specific product(s) to control exactly what appears
- Alternatively, use AI-recommended products if your catalog has a clear complementary structure
- Click "Discount Setting" under the selected product and set a percentage discount exclusive to this offer (15–25% recommended)
- WeUpsell's post-purchase template has a locked layout — intentional, as Shopify's post-purchase surface has strict rendering requirements and the template is pre-optimized for them
Step 3: Review the Conditions Tab
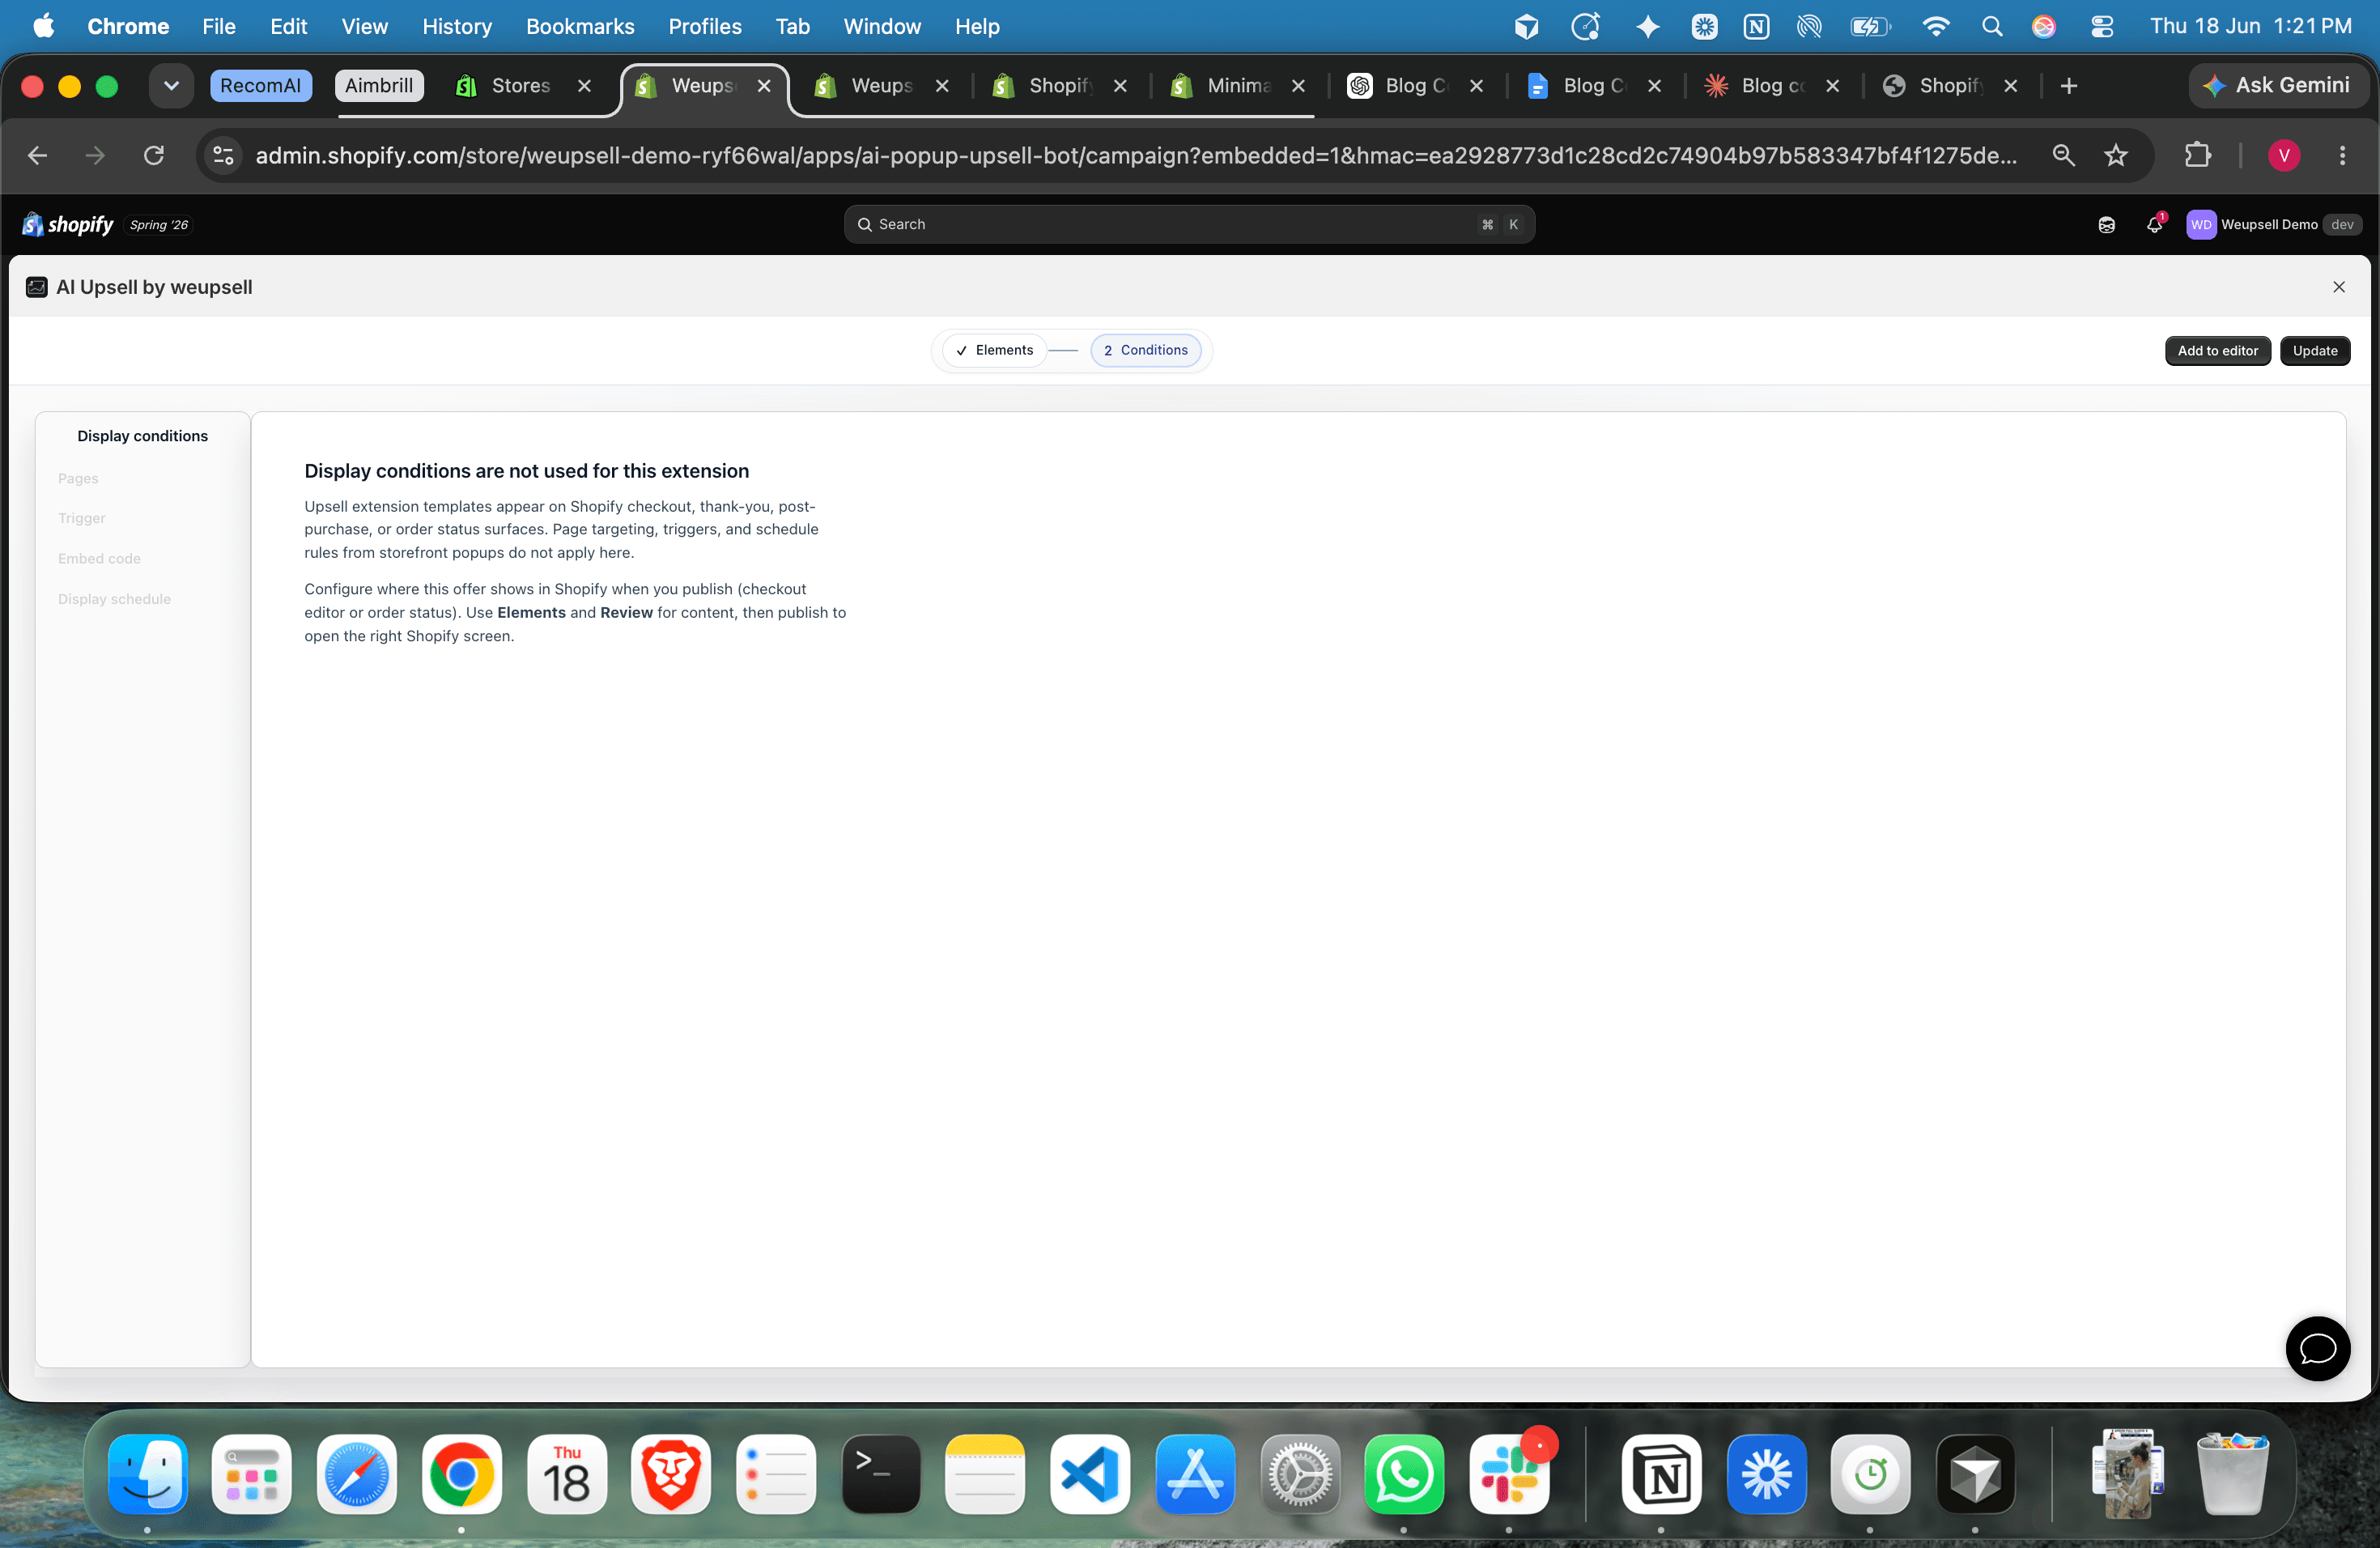
Click Next to move to Conditions (Step 2). You'll see: "Display conditions are not used for this extension." This is correct. Post-purchase extensions trigger based on the checkout event itself — they fire every time a customer completes payment. You control which customers see the offer by choosing the right product targeting — e.g., only show this upsell when the customer purchased Product X.
Step 4: Publish and Open in Editor
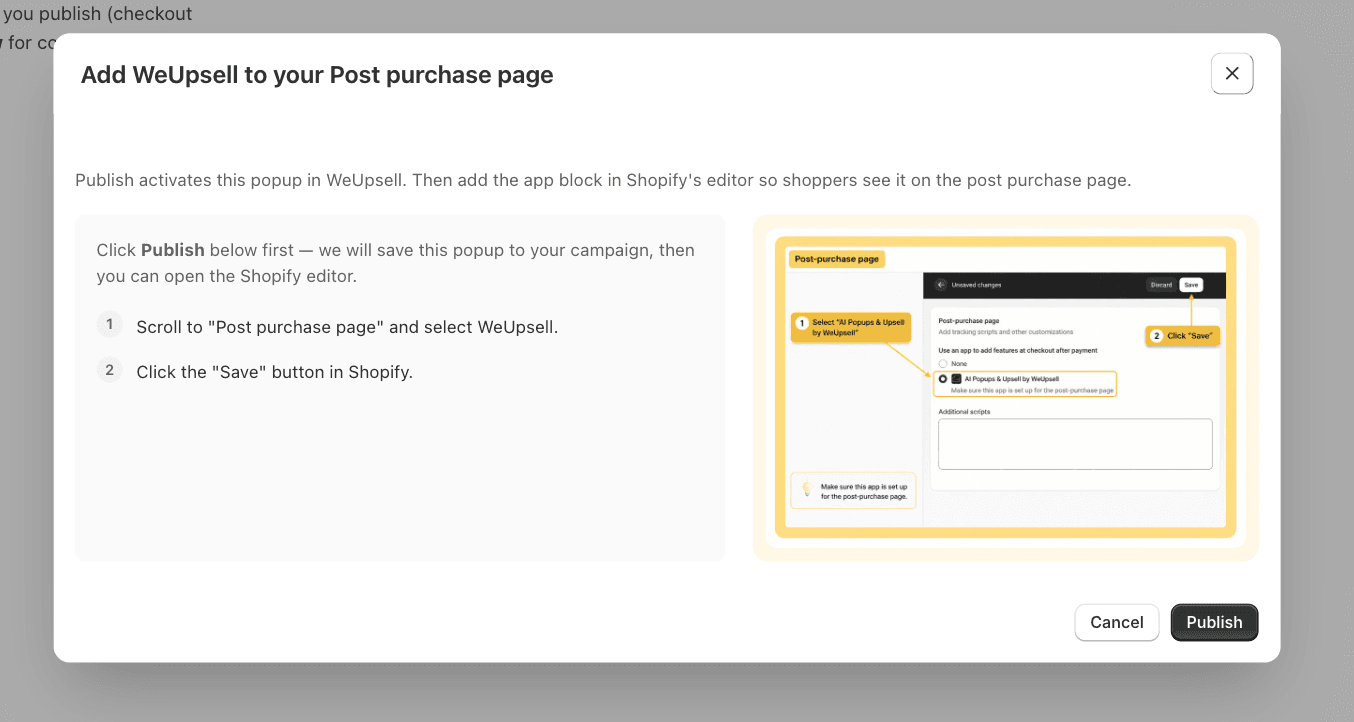
Click Publish & open in editor. A modal will appear confirming the publish action. After publishing, WeUpsell opens Shopify's native checkout editor where you complete the connection.
Step 5: Activate in Shopify Checkout Settings (Critical — Don't Skip)
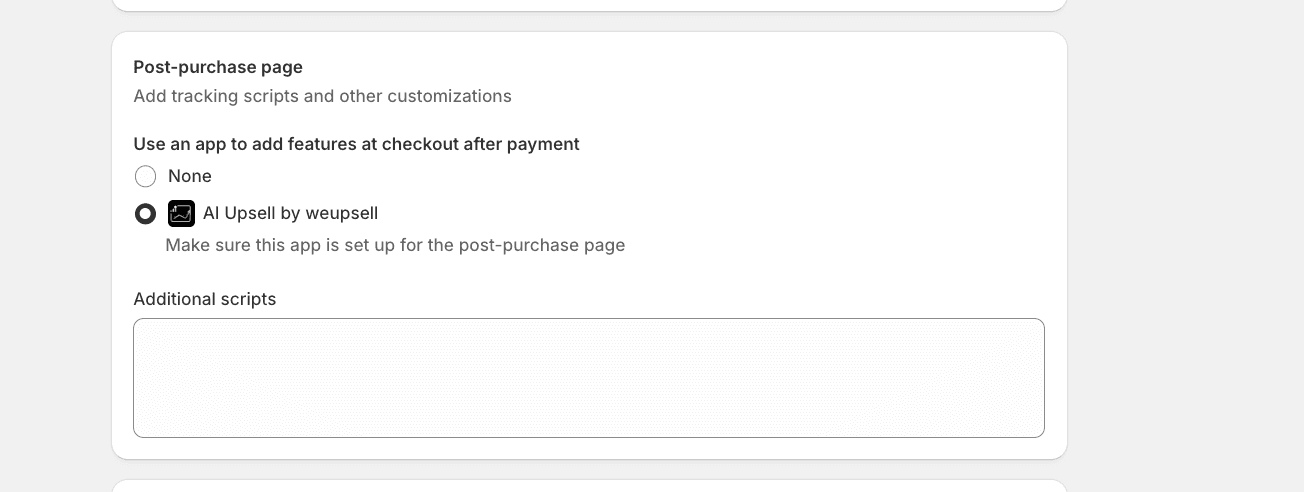
This step is where the majority of merchants who "set up post-purchase upsells" but see zero results went wrong. Publishing inside WeUpsell activates the offer within the app — but Shopify requires you to also designate which app is authorized to serve content on the post-purchase surface.
- Go to Shopify Admin → Settings → Checkout
- Scroll down to the Post-purchase page section
- Under "Use an app to add features at checkout after payment", select AI Upsell by WeUpsell
- Click Save
Until this is done, the post-purchase page remains blank for all customers — no matter how well you've configured the offer inside WeUpsell.
Step 6: Test With a Real Order
Use Shopify's bogus gateway (Settings → Payments → Bogus Gateway) to place a test order. Go through the full checkout flow and confirm:
- The post-purchase offer appears after payment
- The product image, price, and discount are displaying correctly
- The countdown timer is running
- The "Pay now" button adds the product to the order
- The "Decline Offer" link works and routes to the thank-you page
- The offer looks correct on mobile
6 Optimization Moves That Separate 5% Acceptance Rates From 20%
1. Match the Upsell to the Exact Product Purchased, Not the Whole Catalog
If you sell 50 products, you likely need more than one upsell offer. Set up product-specific rules: customers who buy Product A see Upsell A, customers who buy Product B see Upsell B. Generic "bestseller" upsells shown to everyone underperform segmented offers by a significant margin.
2. Test One Variable at a Time
The two highest-impact variables to test first: product choice and discount level (10% vs 20% vs 25%). Change one at a time. Run each variant for at least 50 exposures before drawing conclusions.
3. Write Offer Copy That Reinforces the Original Purchase Decision
- ❌ "Don't miss this amazing deal!" → ✅ "Complete your [Product Name] setup — customers who bought this also added:"
- ❌ "Limited time offer!" → ✅ "Add this to your order before it ships — one click, no extra checkout"
The framing should feel like a service, not a promotion.
4. Don't Let the Timer Feel Fake
A countdown timer only works when it's honest. Verify yours is tied to the session, not the page load. A 3–5 minute countdown is ideal — long enough to read and decide; short enough to feel genuinely time-bound.
5. Show the Accepted Variant Selector
If your upsell product has variants (size, color, etc.), let customers select their variant directly on the post-purchase page. Requiring them to navigate away to choose a size breaks the one-click experience entirely.
6. Monitor Your Acceptance Rate Weekly, Not Monthly
Post-purchase upsell performance can drift — a seasonal product may go from relevant to irrelevant as inventory changes. Check acceptance rate weekly for the first month. If it drops below 6–8%, the most likely culprit is product relevance, not offer design.
What Competitors Are Doing (And What They're Missing)
After studying blogs from WISER, Selleasy, ReConvert, AfterSell, and GemPages, here's what the top-ranking content covers well — and where the gaps are:
What everyone covers:
- Definition of post-purchase upsell
- The psychology (commitment bias, peak excitement)
- App comparisons and pricing tables
- Basic setup steps
What almost no one covers clearly:
- The critical difference between the post-purchase page and the thank-you page
- The Shopify checkout settings activation step — nearly every tutorial glosses over this
- Variant selector UX — a major acceptance rate killer that's rarely mentioned
- Offer pricing psychology — most guides say "offer a complementary product" without any price ratio guidance
Common Questions Shopify Merchants Ask
No. The post-purchase page only appears after payment is processed. The primary sale is complete and cannot be abandoned at this stage. This is the core advantage over pre-checkout upsell placements.
The most common reason is a missed activation step. Publishing the upsell inside your app (like WeUpsell) is not enough. You must also go to Shopify Admin → Settings → Checkout → Post-purchase page and select your app there, then save. Without this step, no customer will ever see the offer.
The upsell is charged to the same payment method used for the original order. Shopify handles this automatically — there is no second checkout, no re-entering of card details.
Technically yes — some apps support multi-product funnels. However, for first-time setup, one focused offer is strongly recommended. Complexity before you have baseline data creates noise, not insight.
Look at your own order history first. Find products that customers frequently buy together across multiple orders — those natural purchase pairs are your highest-probability upsells. Tools like WeUpsell can automate this using AI-based purchase behavior analysis.
Final Word: The Easiest Revenue You Haven't Collected Yet
Post-purchase page upsells don't require more traffic. They don't require a bigger ad budget. They don't require you to redesign your store.
They require one thing: showing up with a relevant offer at the exact moment your customer is most likely to say yes.
Every Shopify store that's configured this correctly — with the right product, the right price, and the right activation settings — generates incremental revenue from orders that were already won. The question isn't whether post-purchase upsells work. The question is how long you're willing to leave that revenue on the table.
This guide focuses specifically on the post-purchase page — the surface between payment and order confirmation. For thank-you page upsells, see our dedicated guide on Shopify Thank You Page Upsells.